macOS
mainly documentation, guides pertaining to the setup of macOS as a server and some other interesting bits. Some of the items may already be obsolete (e.g. macOS server app) however, still valid as i have a macOS server that is currently still an older macOS version.
jump straight to…
- macOS Server app
- back to my mac
- home brew setup
- www on catalina
- lftp on macOS
- openvpn on catalina
- dns enabler on catalina
- snmp on macOS
- reverse dns setup
- changing python to v3
ssh commands required
majority of the ssh commands requires nano or vim. my choice of a terminal editor would be nano. to find out more how to use nano, visit the following page to get the basics.
look out for notes
notes are placed in the guides, these markers requires your attention.
- 🗣 note: comments which you should take note of.
- ⚠️ important: comments which are important.
report inaccuracies and errors
if something in this guide is inaccurate, wrong, or outdated, report it by scanning the qr code.
👨🏻💻 [macOS server app]
currently no longer valid if you have upgraded to catalina
general setup
click on your server name (item just above alerts)
in overview tab, click edit on host name, change it to your fqdn hostname (e.g. domain.com)
computer name, edit as desired
🗣 note: when done correctly, a green dot will appear on your hostname and computer name
website
make sure the green dot is present.
click view server website on the bottom.
🗣 note: default location of where the html files are store are in /Library/Server/Web/Data/Sites/Default/
vpn
turn on vpn on your macOS server.
Select l2tp from the pull down.
vpn host name is your fqdn hostname (e.g. domain.com).
🗣 note: when done correctly, a green dot will appear on the right.
go to router and add UDP ports 500, 1701 and 4500 to forward to your macOS server lan ip. click on apply.
configure your devices with the new shared secret key.
ssl
click the gear icon on the bottom to show all certs.
click the + icon, a drop down will appear.
pull out your certs that your provider sent you.
send all those files over to your macOS.
drag and drop the server.Key to the drop down.
drag and drop the sslcompany…….longest one into the drop down.
drag and drop the sslcompany add trust one into the drop down.
click ok.
select the rsa cert from the pull down menu and your cert should appear on the certificates box.
alerts
select delivery tab.
decide if you want email notifications of push notifications; just click on edit and follow guide.
select what services you want to get alerts for.
👨🏻💻 [back to my mac]
as a pre-requisite: upnp on the router has to be enabled. both computers should be using the same appleid to be logged in as well
⚠️ important: if you’re on 4g, connect back to your LAN, it utilises your router’s NAT for a speedier connection. also ensure that you have back to my mac setup on your macOS.
from settings > sharing, enable remote management.
on your macbook, enable back to my mac as well.
try to connect through a 4g network.
👨🏻💻 [homebrew]
homebrew is a must-have if you’re into having your macOS act more of a server. there’s a ton of tools that you can install such as wget, lftp, etc.
launch terminal.app
paste the following syntax:
/bin/bash -c "$(curl -fsSL https://raw.githubusercontent.com/Homebrew/install/master/install.sh)"
🗣 note: find out more about homebrew at brew.sh
👨🏻💻 [www setup for post-catalina]
after the removal of macOS server app, the gui interface for webhosting is no longer available, there are other options though. credit goes to skk for sharing this how-to
install nginx
ensure that you already have homebrew installed.
launch terminal.app
enter the syntax to install nginx:
brew install nginx
setting up ssl with nginx
if you have a ssl cert, follow these steps to import the necessary items to secure your website
generating the private key and csr file
launch terminal.app
key in the following syntax:
openssl req -new -newkey rsa:2048 -nodes -keyout server.key -out server.csr”.
🗣 note: replace the server with your domain name
- fill in the details such as your country, state, etc.
🗣 note: a prompt will ask you for the common name, to which you will need to type in your domain name that you want to secure with the ssl certificate.
- once done, 2 files will be generated which are called server.key and server.csr.
⚠️ important: these two files will be located in the path where you ran the syntax to genrate the private and csr keys. do a pwd in terminal.app to figure out where they are. you will need these two files in the later part of the setup with your ssl provider.
generate ssl cert and ca-bundle from your ssl provider
in your ssl provider’s ssl console, upload the saved csr cert this will then generate the server.crt and server.ca-bundle file.
once done, you will need to download the server.crt and server.ca-bundle file to your folder.
combining of certificates
open terminal.app on your macOS.
you will need to combine the server.crt and server.ca-bundle file using this syntax:
cat *yourdomainname*.crt *yourdomainname*.ca-bundle >> cert_chain.crt”.the file generated out will be called cert_chain.crt.
configuration of ssl for nginx
- once you have the cert_chain.crt and server.key file, dump the files into: /usr/local/etc/ssl folder.
🗣 note: if you do not see a /ssl folder, create it with mkdir /usr/local/etc/ssl.
you will need to configure the nginx.conf file which is located at /usr/local/etc/nginx.
the completed configuration of the nginx.conf file will look like the one below:
 server {
 listen 80;
 listen 443 ssl;
 ssl_certificate /etc/ssl/cert_chain.crt;
 ssl_certificate_key /etc/ssl/server.key;

 server_name  yourdomainname_com; access_log /var/log/nginx/nginx.vhost.access.log;
 error_log /var/log/nginx/nginx.vhost.error.log;
 location / { root /var/www/;
 index index.html;
 }
the associated website files will need to be placed in /usr/local/var/www.
🗣 note: it might differ from your setup.
setting up re-direct to https
open up terminal.app.
in the nginx config file, locate the following and amend:
 server {
     listen   80;
     listen   [::]:80;
     listen   443 default ssl;

     server_name www.example.com;

     ssl_certificate        /path/to/my/cert;
     ssl_certificate_key  /path/to/my/key;

     if ($ssl_protocol = "") {
     rewrite ^   https://$server_name$request_uri? permanent;
     }
 }
save the file and exit.
👨🏻💻 [lftp]
lftp is a text-based ftp client for your macOS. when interacting with other lftp setups, it downloads items really quick as they are split into segments before being combined. this guide assumes that you already have lftp setup at another location (e.g your seedbox) and you will need lftp to download whatever (securely) to you.
installing lftp
launch terminal.app.
install lftp via the following syntax:
brew install lftponce done, exit terminal.app.
configuring lftp
🗣 note: a good guide on the setup can be found at [whatbox] (https://whatbox.ca/wiki/lftp)
the only issue that i have is that after I do a lftp wb in terminal, i had to change directory into my account, which is the following:
cd /mnt/mpathz/moraesfamily
launch terminal.app.
access the config file:
vim /usr/local/etc/lftp.confadd the following items in:
🗣 note: add it under the line: #alias hostls command ls
    ##MyMods
    set bmk:save-passwords true
        alias dir !ls -Fsh –group-directories-first
        alias j jobs
        alias jv jobs -v
        alias q queue
        alias qs queue stop
        alias k kill
        alias ka kill all
        alias down lcd **/path/to/where/you/want/to/receive/on/your/macos**
        alias m mirror -c –use-pget-n=5
alias p pget -c -n 5- save and exit.
👨🏻💻 [openvpn enabler for catalina]
i managed to find this openvpn enabler for the catalina macOS flavour, i have not tried this out but feel free to do so.
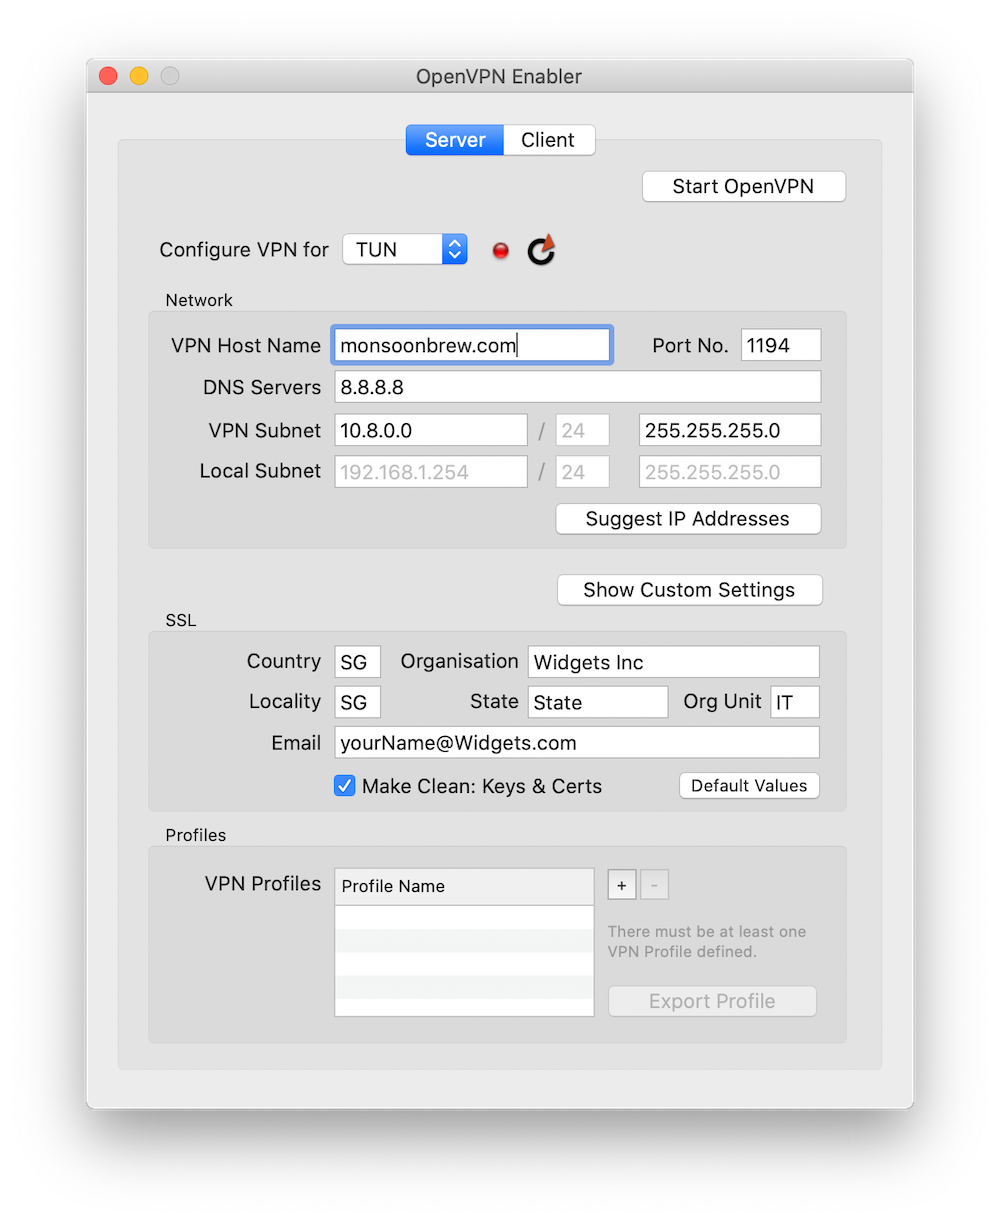
- you can download the file from the following:
- find out more at the following developer’s website:
👨🏻💻 [dns enabler for catalina]
this might be useful if you want to have dns pointed from some internal ip to be able to use your wan interface (e.g vpn setup on another device which requires wan facing interface.) the current dns i am using is from the macOS server (sierra flavour). if you have moved up to catalina, you probably need this.
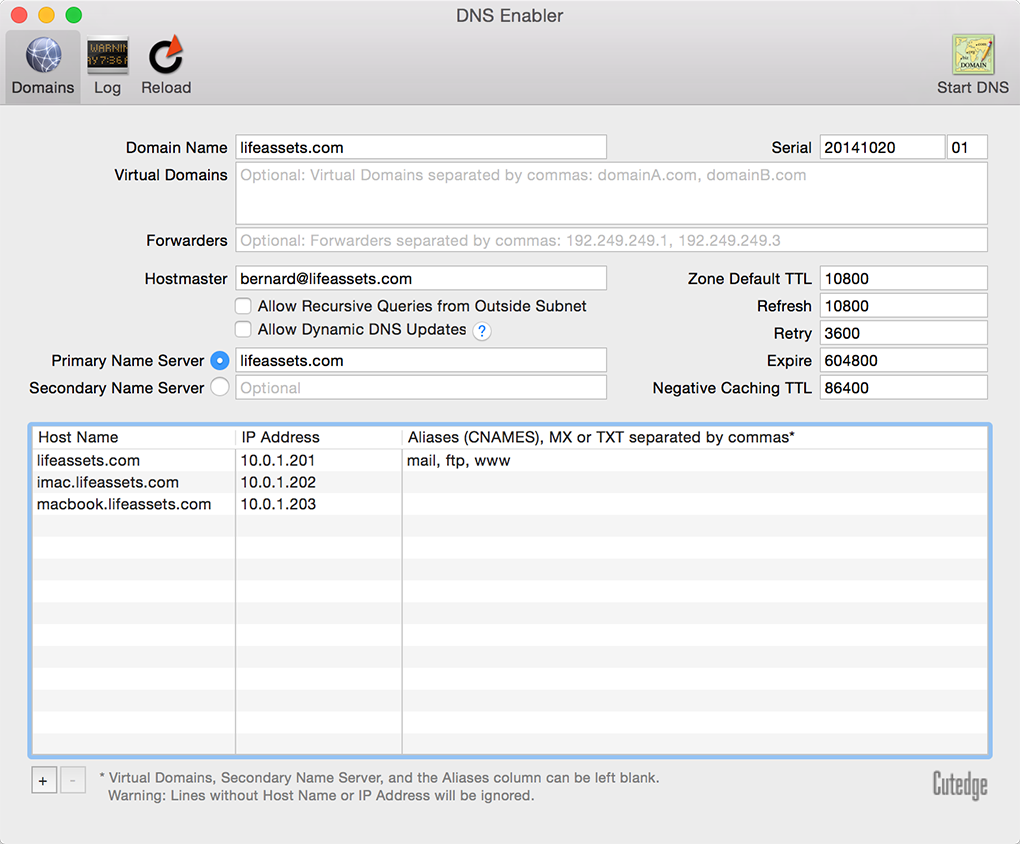
- this software isn’t free, so you need to purchase it from the following:
👨🏻💻 [installing and enabling snmp]
launch teriminal.app.
locate the snmpd.conf file under /etc/snmp/snmpd.conf and save a backup copy, maybe with this command:
mv /etc/snmp/snmpd.conf /etc/snmp/snmpd.conf.orgchange the snmpd.conf file with the following command:
sudo nano /etc/snmp/snmpd.confchange your rocommunity string if required.
🗣 note: in our example, it looks like this:
   #Allow read-access with the following SNMP Community String:
   rocommunity public

    # Location of the device
    syslocation Your Data Centre Name

    # Human Contact for the device
    syscontact SysAdmin

    # System Name of the device
    sysName SystemName

    # the system OID for this device. This is optional but recommended,
    # to identify this as a MAC OS system.
    sysobjectid 1.3.6.1.4.1.8072.3.2.16
start the snmp service, e.g. with the following command:
sudo launchctl load -w /System/Library/LaunchDaemons/org.net-snmp.snmpd.plistexit the terimal.app.
👨🏻💻 [reverse dns setup]
finally I got this to work. this setup is for the macOS server app only. using ombi as an example here. ombi when installed will show up as http://ip-address:5000/
create a web app configuration file on your macOS server:
sudo nano /library/server/web/config/apache2/httpd_ombiwebapp.confin the ombiwebapp.conf file enter the following:
 proxypresevehost on
 proxpassreverse / http://lan-ip:5000/
 proxypass / http://lan-ip:5000/
 servername sub.domain.com
save the file.
next, create the webapp.plist:
sudo nano /library/server/web/config/apache2/webapps/com.example.ombiwebapp.plistkey in the following:
 <?xml version="1.0" encoding="UTF-8"?>
 <!DOCTYPE plist PUBLIC "-//Apple//DTD PLIST 1.0//EN" "http://www.apple.com/DTDs/PropertyList-1.0.dtd">

 <!-- See man pages for webapp.plist(5) and webappctl(8) for information about this example webapp.plist -->

 <plist version="1.0">
         <dict>
             <key>includeFiles</key>
                 <array> <!-- Include files are activated in virtual host when webapp is started -->
                     <string>/Library/Server/Web/Config/apache2/httpd_ombiwebapp.conf</string>
                 </array>
             <key>name</key>
                 <string>com.example.ombiwebapp</string>
             <key>displayName</key> <!-- Name shown in Server app -->
                 <string>ombiWebApp</string>
             <key>installationIndicatorFilePath</key> <!-- The presence of this file indicates web app is installed -->
                 <string>/Library/Server/Web/Config/apache2/httpd_ombiwebapp.conf</string>
             <key>sslPolicy</key><!-- Determines webapp SSL behavior -->
                 <integer>0</integer> <!-- 0: default, UseSSLWhenEnabled -->
                                     <!-- 1: UseSSLAlways -->
                                     <!-- 2: UseSSLOnlyWhenCertificateIsTrustable -->
                                     <!-- 3: UseSSLNever -->
                                     <!-- 4: UseSSLAndNonSSL -->
             </dict>
     </plist>
save the file.
now you will need to chown and chmod both files:
 sudo chown -r root:wheel /library/server/web/configuration/apache2/httpd_ombiwebapp.conf
 sudo chown -r root:wheel /library/server/web/configuration/apache2/webapps/com.example.ombiwebapp.plist
 sudo chown -r 644 /library/server/web/configuration/apache2/httpd_ombiwebapp.conf
 sudo chown -r 644 /library/server/web/configuration/apache2/webapps/
now logon to your macOS and access the server app.
navigate to websites and add a new website using the + sign. fill in the domain name and leave everything else as default.

🗣 note: replace ombi.domain.com to the servername you set in httpd_ombiwebapp.conf.
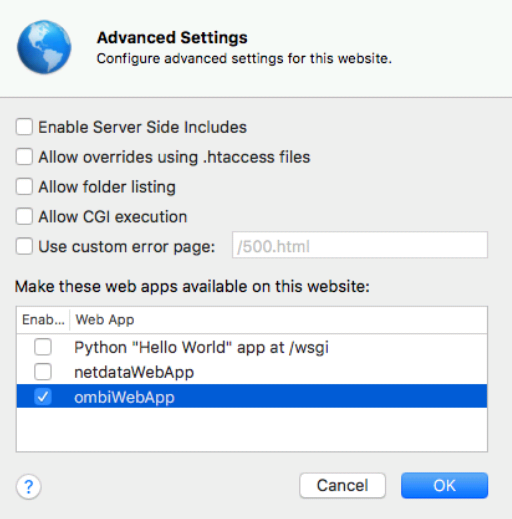
- click on edit advanced settings and select the ombiwebapp.
click on ok and then click on create.
exit the macOS server app.
open up the terminal.app and flush your dns with the command:
sudo killall -HUP mDNSResponderaccess your reverse dns site.
👨🏻💻 [changing python to v3]
if you have brew installed, follow these commands.
launch your ssh and type
brew install python3
brew update && brew upgrade python
Alias python=/usr/local/bin/python3