synology
so this houses a collection of how-to guides for synology. there are some obsolete instructions but i still kept this in, well, just in case it might be needed again. these obsolete ones will be flagged as obsolete, for your notice. eventually, i’ll find the time to have these archived.
jump straight to…
- cronjob setup
- optware setup
- startssl setup
- watchtower setup
- istats for synology
- crashplan backup setup
- unable to update dsm fix
ssh commands required
majority of the ssh commands requires nano or vim. my choice of a terminal editor would be nano. to find out more how to use nano, visit the following page to get the basics.
look out for notes
notes are placed in the guides, these markers requires your attention.
- 🗣 note: comments which you should take note of.
- ⚠️ important: comments which are important.
report inaccuracies and errors
if something in this guide is inaccurate, wrong, or outdated, report it by scanning the qr code.
👨🏻💻 [cronjob]
cronjob for cacti poller needs to be added in every time a reboot is performed. (provided you still have cacti installed)
login to your terminal shell and key in the following:
vi /etc/crontabin the crontab screen, enter the following:
*/5 * * * * nobody /usr/bin/php /volume1/web/cacti/poller.php > /dev/null 2>&1Save the crontab
Run the command:
/usr/syno/sbin/synoservicectl --restart|stop|start crond.
🗣 note: each space for the crontab entry (/5 * …) has to be spaced via TAB on your keyboard.*
👨🏻💻 [startssl]
useful if you are hosting websites on your synology box, however, word of warning: revocation of cert carries a USD24.95 fee.
for existing certs, renewal to be sent to your registered startssl, 2 weeks before expiration.
for new implementation, refer below.
[mikebeach.org] (http://mikebeach.org/2012/11/13/startssl-ssl-certificate-on-synology-nas-using-subdomain/)
👨🏻💻 [watchtower for docker synology]
watchtower is used to assist with keeping your docker containers updated. i’m currently using that to assist with this.
firstly, ssh into your Synology and add the symlink:
ln -s /var/run/docker.sock /volume1/docker/docker.socknext, logon to your synology box and create a scheduled task
go to control panel” > “task scheduler”
click “create” > “scheduled task” > “user-defined script”
on the “create task: window, make sure “user:” is selected as “root” and rename the “task:” to whatever you like.
click “schedule” tab. under “date - run on the following days”, select “daily”. under “time - frequency”, select “every 1 hour(s)” (just to be on the safe side).
click “task Settings” tab. under “run command - user-defined script”, paste sudo ln -s /var/run/docker.sock /volume1/docker/docker.sock into the text box and press “ok”
the newly created task will be listed there. click to highlight it and then click “run” to run it once, immediately.
head back to your ssh and execute the following:
sudo docker run -d --name watchtower -v /volume1/docker/docker.sock:/var/run/docker.sock centurylink/watchtower --interval 82800 --cleanupexit your terminal window and you’re done.
👨🏻💻 [istats for synology]
istats can be installed on your synology box and monitor through your apple devices
ssh into your synology box.
access debian chroot via the following syntax
/var/packages/debian-chroot/scripts/start-stop-status chrootcreate a istats directory which will be temporary only
mkdir /opt/istatinstall all the required depedencies
 apt-get install g++
 apt-get install autoconf
 apt-get install libxml2-dev
 apt-get install libssl-dev
 apt-get install libsqlite3-dev
 apt-get install libsensors4-dev
 apt-get install libavahi-common-dev
 apt-get install libavahi-client-dev
next change directory to istats:
cd /opt/istatsand grab the istatserver file:
wget https://s3.amazonaws.com/bjango/files/istatserverlinux/istatserver-x.xx.tar.gzuntar it:
tar -zxvf istatserver-3.01.tar.gznext build it:
 ./autogen
 ./configure
 make
 make install
run it:
/usr/local/bin/istatserver -dyou will need the 5-digit pin when you add your box into your iStat app. see the pin by accessing the following:
nano /usr/local/etc/istatserver/istatserver.confyou’re done, exit the terminal screen and check on your apple devices
👨🏻💻 [crashplan]
on 22 aug 2017, Code42, has shutdown their home-based backup plans. if you decide to use this, they now only offer business plans, i am not sure of their pricing tier but the free shit is now gone. therefore, i am no longer using this.
this guide is to setup a headless client and requires that you have docker installed on your synology box.
ssh into your synology box and login as root.
install the crashplan container
sudo docker pull jrcs/crashplannow run the container:
sudo docker run -d --name Crashplan -p 4242:4242 -p 4243:4243 -v /volume1:/volume1 jrcs/crashplan:latest
🗣 note: If you have more volumes to backup simply add more -v as needed, like -v /volume2:/volume2 — etc.
login to dsm and navigate to: docker > container > crashplan > details > terminal > create > bash
type the following:
cat /var/lib/crashplan/.ui_infocopy the guid string
🗣 note: It is the one which is in bold: 4243,89d0deff-512s-433c-89sa-7482e3cjdu7a,0.0.0.0
next, go to docker > container > crashplan and stop the container.
click on edit then check enable auto restart then ok and start the crashplan container again.
you are done with the setup for the synology box.
these next parts is to be done on your mac server
now lets edit the .ui_info file located on mac server.
ssh into your mac server and execute the following command:
vim /Library/Application Support/CrashPlan/.ui_infoensure that with the copied guid from your synology box in step 6 above and replace the original guid in the .ui_info file on your mac server. the ip address should reflect your synology lan ip, sample as shown below
4243,89d0deff-512s-433c-89sa-7482e3cjdu7a,192.168.1.100save and exit
now, the last step, edit the ui.properties file.
🗣 note: it is likely that your ui.properties file is named ui_macusername.properties, edit that file.
enter the following information:
serviceHost=192.168.1.100
save and exit.
launch the crashplan app and let it run.
⚠️ important: for every 1tb of data being backed up, your Synology box must have ram (memory) that correlates, e.g. 1tb = 1gb ram and so on. if your device does not have enough ram, i would suggest to not back up your plex library but your important documents instead. :)
👨🏻💻 [unable to update dsm - insufficient disk space]
if you ever get this issue, it is likely your /dev/md0 partition does not have enough space to have the update installed. i previously had this issue so i ended up removing all the log files in that partition and get it below 69%.
ssh into your synology and gain root access.
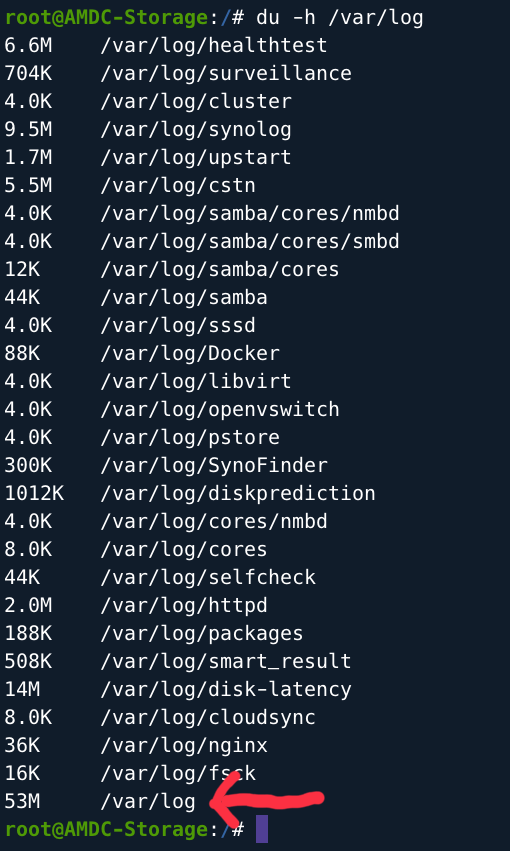
change to your root directory and then execute the following command:
du -h /var/logthis will then provide the directory of /var/log and the file sizes. so as you can see my log directory is indeed larger than the rest.
what i did was to do a logrotate first.
truncate -s 0 nameoflog.logyou can see the progress here:
logrotate -vf /etc/logrotate.confonce you are done, check again and you will see that the disk space has dropped for /dev/md0.
 du -h /var/log
 df -h
if all else fails, you can also remove the log files:
rm -rf *.loggood luck.